With
more than 4 million users, Odoo has unleashed it’s potential of
being the best management software to run a company. Odoo’s
framework is unique, with its strong technical foundation, making it
easy for thousands of developers and business experts to deal through
their any sorts of requirements.
Odoo13, being the recent version is very simple and intuitive suite for business management. In the next sections we will cover the steps for installing Odoo13 on Ubuntu 18.04 Linux. We will begin with standard OS updates then into dependencies package installations.
The procedures for Odoo13 installation is:
1)Update and Upgrade
Ubuntu
Update your ubuntu with the following commands
sudo apt-get update
sudo apt-get upgrade - y
2)Create a system user
Create system user which will own and run Odoo application. If you follow the below steps,the source code of Odoo will reside in the home directory of the created user.
sudo adduser --system --home=/opt/odoo --group odoo
3)nstall prerequisite dependencies
Install GIT, Python3 pip, and other required packages to start Odoo through following comman
sudo apt install git python3-pip build-essential wget python3-dev python3-venv python3-wheel libxslt-dev libzip-dev libldap2-dev libsasl2-dev python3-setuptools node-less
Odoo requires git to be installed on your machine inorder to clone and you should have basic knowledge of git commands.
Python 3.6 or later and pip3 is adequate to run Odoo13.Check the versions of python and pip, if it’s already installed.
4)Install PostgreSQL Database and Configure it
Odoo uses PostgreSQL as database management system.Install the latest version of PostgreSQL
Create odoo user for postgreSQL by following command:
After changing the user ,use \q to exit.Then exit from postgres user by exit command to continue the installation.
After installing and configuring postgreSQL,install wkhtmltopdf to print pdf reports in Odoo. The recommended version of wkhtmltopdf to install is 0.12.5 and
its
available in wkhtmltopdf
downloadpage, in the archive section of the following commands
sudo dpkg -i wkhtmltox_0.12.5-1.bionic_amd64.deb
sudo apt install -f
6)Install Odoo web dependencies
To install web dependencies,use the following coomands:
sudo ln -s /usr/bin/nodejs /usr/bin/node
sudo npm install -g less less-plugin-clean-css
sudo apt-get install -y node-less
sudo python3 -m pip install libsass
7)Download and configure Odoo13
To install Odoo13,there are two ways to obtain the source code of Odoo : as a zip archiveor through git. You can download ZIP file from GitHub Odoo Repository.
Before cloning, ensure that git is installed. We have already installed git in step3, while installing prerequisite dependencies.So switch to the Odoo user to clone Odoo13,otherwise there will be access rights related issues.Inorder to change to Odoo system user use the following commands:
Odoo source files will be downloaded to the user’s home directory which will be ‘/opt/odoo’. After that exit from the Odoo user by using exit command in order to continue the installation process
8)Install
Odoo
dependencies
Odoo dependencies are listed in the requirements.txt file located at the root of the Odoo directory. Navigate to the path of your Odoo installation and run pip on the requirements.txt file that list all the python dependencies.
cd /13.0 (give path of your installation)
sudo pip3 install -r requirements.txt
or you can use the following commands to install the required packages also:
9)Set Odoo Configuration
After cloning and installing all the dependencies for Odoo,we have to create the log file.We need to create a directory in which Odoo will maintain and create log files.The directory for Odoo log files can be created by using the following command:
Set the access rights to the Odoo user we have created by below command:
In order to ensure the smooth working of Odoo, we need to edit the configuration file by using the text editor nano through the following command:
Alter the configuration file as below:
; admin_passwd = admin
db_host = False
db_port = False
db_user = odoo
db_password = False
logfile = /var/log/odoo/odoo.log
addons_path = /opt/odoo/odoo/addons
The configuration file of Odoo should have these parameters:
admin_passwd
:
admin password for PostgresSQL database.
db_host
: specify the database host.
db_port:
specify the database port .
db_user : specify the database user name.
db_passwd : specify the database password.
addons_path : specify the basic addons and custom addons(seperated by commas).
log_file : specify the log file location to store log details.
sudo chmod 640 /etc/odoo.conf
10)Configure Odoo Service
After configuring the odoo.config file,our next step is to create a service unit file called odoo.service by using below command:
Set the contents of the files as below:
Description=Odoo
Requires=postgresql.service
After=network.target postgresql.service
[Service] Type=simple
SyslogIdentifier=odoo
PermissionsStartOnly=true
User=odoo
Group=odoo
ExecStart=/opt/odoo/odoo-venv/bin/python3 /opt/odoo/odoo-bin -c /etc/odoo.conf
StandardOutput=journal+console
[Install] WantedBy=multi-user.target
After configuring the Odoo service file,notify the system about it by using the following command:
Start the Odoo service and enabled it to start on boot by running:
sudo systemctl start odoo.service
You can verify the service status by:
The output should look something like below,
- odoo.service
Tasks: 4 (limit: 2362)
CGroup: /system.slice/odoo.service
└─1860 /opt/odoo/odoo-venv/bin/python3 /opt/odoo/odoo-bin -c /etc/odoo.conf
To see the message logged by the odoo service, use the command below:
11)Go to Web Browser
After following all these steps of installation,finally you have to go to web browser and enter the following URL.
If
everything is working properly the page will be redirected to Odoo’s
database creation page. If you want to change the default port number
from 8069 you have to change it in the configuration file.Create a
database here: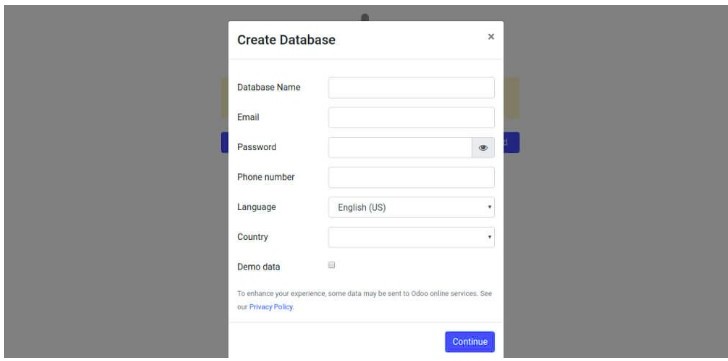
These are the steps to install Odoo13 in the local machine. We hope you have found this article helpful.For more information please visit, odoo installation documentation.If you have any requirements be it migrating from older to new Odoo 13, or the very new Odoo implementation, Odox Soft Hub can help you with that.
Odox Soft Hub is one of the leading developers in Odoo.For more information regarding the customized software, drop a mail at info@odoxsofthub.com. To explore more about us feel free to get in touch with us.